The detail-preserving foldback clipper — VST3 / AU / AAX, Windows & macOS.
1. Introduction
Grandma’s Spice is a clipper that refuses to throw detail away. Where a standard hard
clipper flattens everything above the threshold into a featureless plateau, Grandma’s Spice
folds the overshoot back into the permitted range — reflecting it off the
threshold, as many times as it takes. High-frequency texture and transient detail riding on the
peaks survive, even when you push the input far past the rails.
Around that core sit a Delta control that sets how much folded detail is blended
back (with a dedicated EQ that shapes only the overshoot), a
four-flavour saturation pad (Linear, JFET, Op-Amp, Transformer), three 8-band
parametric EQs, oversampling up to 8×, and a live spectrum analyser and oscilloscope.
2. Quick start
Insert Grandma’s Spice on a drum bus, synth, or full mix.
Lower Threshold until the meters and spectrum show clipping activity.
Raise Delta to bring folded detail back in; cut it for a harder, cleaner clip.
Click Fold Mode to audition the three fold shapes (see section 5).
Open the Saturation tab and drag the pad node toward JFET, Op-Amp, or Transformer for analog colour.
Balance the level with Output; raise Oversampling if you hear aliasing on bright material.
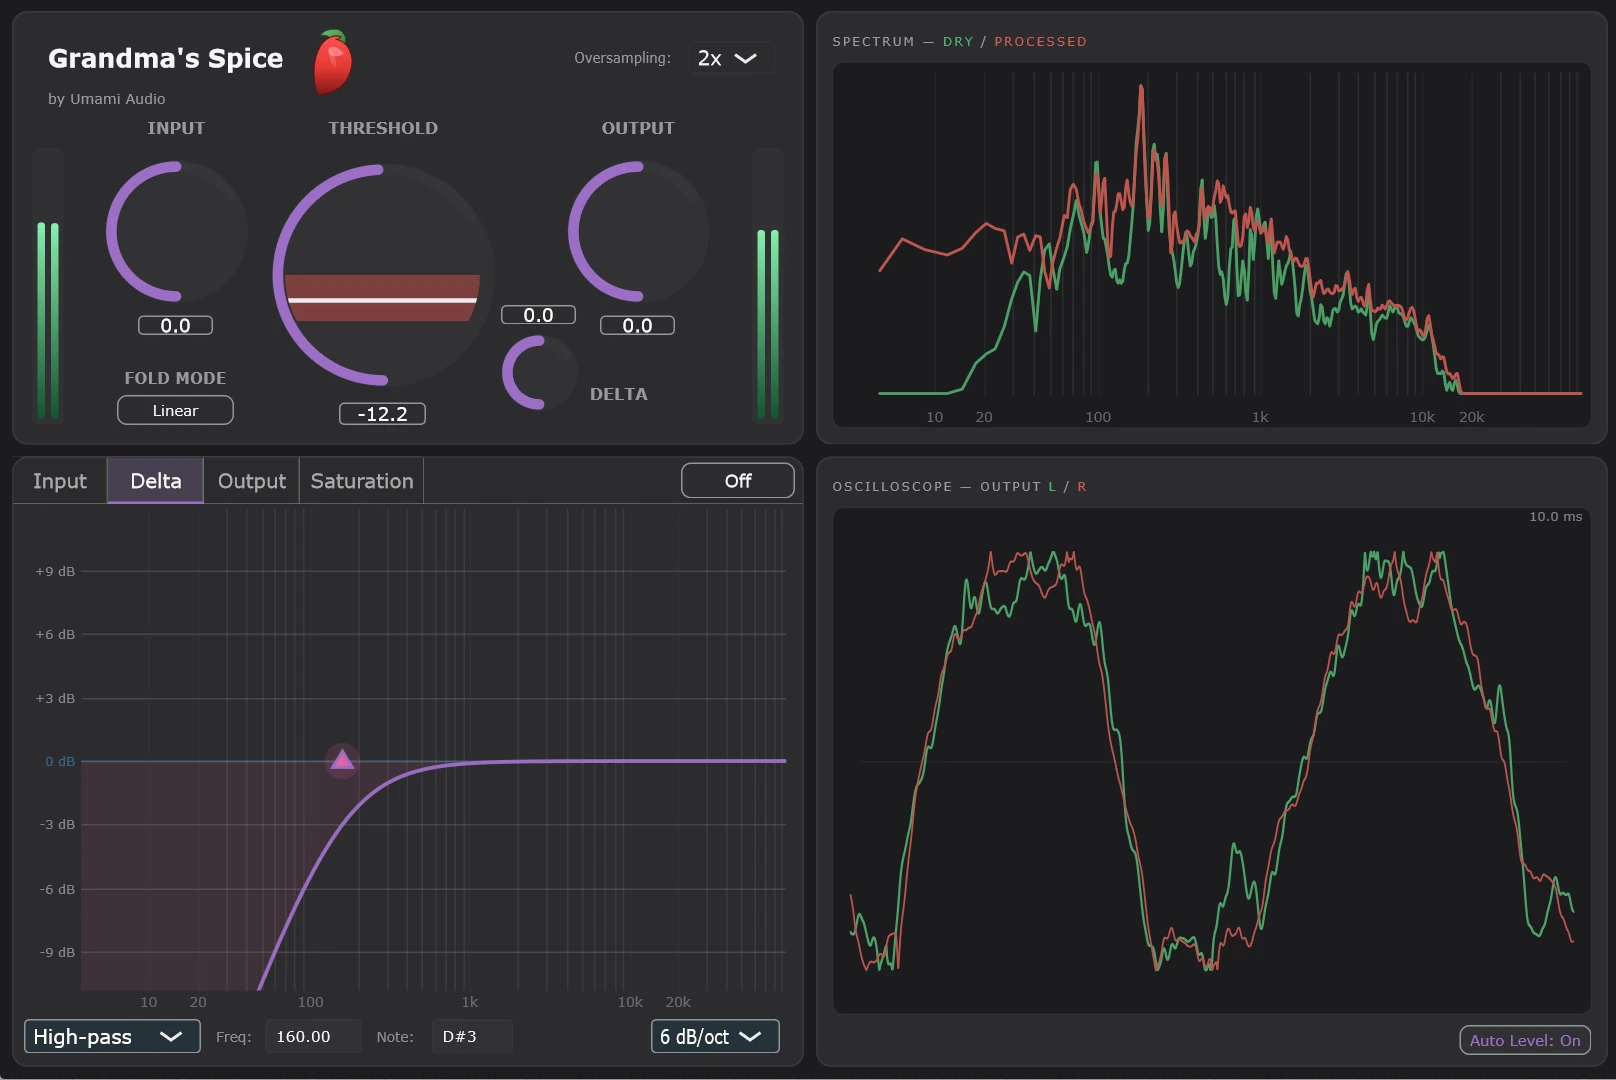
Top left — the main drive knobs (Input, Threshold, Output, Delta), Fold Mode button, oversampling selector, and stereo input/output meters.
Top right — the spectrum analyser, overlaying the dry and processed signals.
Bottom left — the tab strip: Input, Delta, and Output EQs plus the Saturation pad.
Bottom right — the oscilloscope.
The Scopes button hides or shows the two analyser panels; with scopes hidden the
window collapses to a compact half-width layout. Hovering any control shows a tooltip explaining it.
4. Main controls
Control
Range
Default
What it does
Input
−60 … +20 dB
0 dB
Input trim, applied before everything else. Drive it up to push the signal into the threshold.
Threshold
−48 … 0 dB
0 dB
The clip/fold rail. Anything beyond ±Threshold is folded back inside. Lower = more folding. The knob’s disc doubles as a VU-style gain meter comparing the signal after make-up gain against the signal after the input trim — the net gain the processing adds or removes.
Delta
−60 … +36 dB
0 dB
How much of the folded overshoot (“the detail”) is blended back. At full cut you get a hard clip; at 0 dB the fold is at unity; boosting drives extra overshoot into the fold for denser harmonics.
Output
−60 … +20 dB
0 dB
Make-up gain after the Output EQ, just before the final brick-wall stage.
Fold Mode
Mode 1 / 2 / 3
Mode 1
Selects the fold shape (section 5). Click to advance; Shift-click or right-click to step back. Switching is click-free, so compare while audio runs.
Oversampling
1× / 2× / 4× / 8×
1×
Runs the clipper, fold, and saturation at a multiple of the session rate to suppress aliasing. Higher settings add a little latency (reported to the host) and CPU.
Meters
−72 … +12 dB
Stereo input and output peak meters flank the drive section; the region above 0 dBFS is drawn in red. The input meter reads the signal just after the input trim; the output meter reads it just after make-up gain, before the final brick-wall stage.
Knob gestures: drag vertically to turn; double-click a knob or its value box to
reset; scroll to step (faster spins take bigger steps, Shift for fine control); click
the value text to type an exact number. Input, Output, and Delta place 0 dB at 12 o’clock.
5. The three fold modes
The fold shape decides how the overshoot reflects off the threshold:
Mode 1 — Triangle
The classic wave-folder zig-zag: the overshoot reflects with a sharp corner at the rail. The
brightest and most aggressive mode — dense upper harmonics, real bite. Great on drums and
anything that should cut.
Mode 2 — Sine
A smooth sinusoidal reflection — the folded peak lands exactly at the threshold with no
hard corner. Rounder, warmer harmonics that stay musical as you keep pushing the input.
Mode 3 — Soft
The same sine fold, but blended over a soft-clip baseline with no hard clip corner anywhere
— and designed so that EQ’ing the folded overshoot (the Delta EQ) never stamps an
audible edge onto the waveform. The smoothest, most transparent mode; ideal on the mix bus.
All three modes crossfade seamlessly when switched, so you can A/B them in real time.
6. The three EQs
Three independent 8-band parametric EQs sit at different points in the chain:
Input — shapes the signal before it hits the threshold. Use it to pre-emphasise what you want the fold to chew on.
Delta — the signature move: this EQ shapes only the folded overshoot, not the in-range signal. Brighten just the detail, or high-pass the fold so the low end clips cleanly while the top folds.
Output — conventional post-EQ after the saturation stage, before make-up gain.
Each band offers Bell, Low/High Shelf, Low/High-pass (6–48 dB/oct), Notch, and Band-pass
types, 1 Hz–96 kHz frequency, ±24 dB gain, and Q from 0.05 to 40.
Each strip has its own bypass.
Working the graph
Drag a band handle to set frequency (horizontal) and gain (vertical).
The numeric fields below accept typed values — the frequency field understands 2200, 2.2k, or 2.2 kHz, and the Note field accepts pitches like G#5 (A4 = 440 Hz).
Drag up/down on a field’s caption to scrub its value (Shift = slower); double-click to reset; scroll to step.
The dB scale gutter on the left of the graph is a zoom control — drag or scroll it to change the visible dB range.
7. The saturation section
The fourth tab holds the saturation pad: an XY surface whose corners are four saturator flavours.
The signal leaving the fold stage always passes through this blend. Drag the node anywhere on the
pad — its position sets the mix of the four corners, and each corner’s live share is
shown as a percentage.
Corner
Character
Linear
Clean pass-through — the “dry” leg of the blend. The default position is 100% Linear.
JFET
Square-law transistor asymmetry: second-harmonic warmth that thickens as you drive it.
Op-Amp
Amplifier-stage rounding. In its normal mode the low end (below ~80 Hz) passes clean while the highs saturate; click its label to switch to Retro, which saturates the full band.
Transformer
Magnetic-core character: hysteresis “memory,” even-harmonic bias, and a gentle high-frequency roll-off.
Corner controls
Click a corner label to cycle its state: JFET and Transformer step through normal → asymmetry-flip (inverts the harmonic bias) → bypassed; Op-Amp steps On → Retro → Bypass; Linear toggles on/off.
A bypassed corner’s share is redistributed to its neighbours — the on-screen percentages always match what you hear.
Double-click the pad to reset the whole section (node to Linear, all corners active).
The entire section can be bypassed from the Saturation tab’s right-click menu.
All four corners are loudness-matched, so morphing between flavours doesn’t jump in level,
and every state change is smoothed — no clicks.
8. Spectrum & oscilloscope
Spectrum analyser
Overlays two curves — the dry signal (after the Input EQ) and the
processed signal (after the final stage) — so you can see exactly what the
fold and saturation added or tamed.
Oscilloscope
Drag horizontally to change the time window (5–500 ms); scroll to zoom.
Auto level keeps the trace peak-normalised. Turn it off to set the vertical zoom yourself by dragging up/down.
Both panels are display-only and can be hidden with the Scopes button to shrink the window.
9. Signal flow
From input to output, the chain runs:
Input Gaindrive into the threshold · input meter + VU reference tap right after this stage
Input EQ8-band pre-shaping · spectrum “dry” tap after this stage
Fold-Back Clipperclip + fold per the fold mode; the Delta EQ & Delta level shape the folded overshoot before it’s blended back
Saturation BlendXY mix of Linear / JFET / Op-Amp / Transformer
Output EQ8-band post-shaping
Output Gainmake-up level · output meter + VU tap right after this stage
Brick-Wall Clipfinal bound at 0 dBFS · spectrum “processed” and oscilloscope taps here
All meter and analyser taps are listen-only — they never feed back into the audio path. The
Threshold knob’s VU readout is the level ratio between the output-gain tap and the
input-gain tap, so it reports the net gain of everything between them (it excludes the input trim
itself and the final brick-wall). With oversampling engaged, the entire chain above runs at the
elevated rate. There is no global dry/wet control — blending happens inside the Delta stage
and on the saturation pad, where the Linear corner acts as the clean leg.
10. Gestures & shortcuts
Gesture
Effect
Drag
Turn knobs, move EQ handles, position the saturation node, zoom scopes.
Double-click
Reset a knob, EQ field, or the saturation pad to its default.
Scroll wheel
Step values; spin faster for coarser steps. Works on knobs, EQ fields, type/slope selectors, and scope zoom.
Shift + drag / scroll
Fine adjustment.
Click value text
Type an exact value (frequency fields accept 2.2k and note names like G#5).
Right-click / Shift-click Fold Mode
Step backward through the modes.
Click a saturation corner label
Cycle that corner’s state (normal / flip or Retro / bypass).
Right-click the Saturation tab
Bypass the entire saturation section.
11. Tips
Start with Threshold, finish with Delta. Set the amount of clipping first, then dial the folded detail to taste — Delta is the character control.
High-pass the Delta EQ around 200–300 Hz to keep the low end clipping cleanly while the mids and highs fold. This is the fastest route to “loud but not mushy.”
Mode 3 for buses. When Grandma’s Spice is the last stage on a mix, Mode 3 with a modest Delta keeps things transparent while still catching peaks.
Watch the Threshold disc. Its VU-style readout shows the net gain of the processing (from after the input trim to after make-up gain) — aim near 0 dB for honest A/B comparisons.
Oversample bright material. Folding generates high harmonics by design; 4× keeps them from aliasing back down on cymbals and distorted synths.
12. Support
Questions, bug reports, or feature requests — we’d love to hear from you: